Deburring and Edge Breaks: The Drawing Note That Stops Arguments at Delivery
Deburring is the step nobody puts in the quote until a part arrives with a sharp edge that cuts a finger or a burr that jams an assembly. It is also one of the cheapest things to specify clearly. A single line on the drawing, with a size and a scope, replaces a long email exchange after delivery.
What a burr is and why it matters
When a cutting tool leaves a surface, it pushes a thin ridge of material over the edge. That ridge is a burr. It can be a few hundredths of a millimetre on aluminium milled with a sharp tool, and noticeably larger on soft or ductile materials such as copper, annealed stainless steel and plastics. Burrs form on exits of holes, at the end of milled slots, on the sides of turned grooves and especially inside cross holes where a drill meets another bore.
Burrs cause real problems:
- They cut hands during assembly
- They break off and contaminate hydraulic or pneumatic circuits
- They prevent two parts from seating flat
- They damage seals and O-rings during installation
- They interfere with threads
An edge break, meaning a small chamfer or radius on the corner, also helps coatings. Paint, powder and anodize pull away from a razor edge, so a rounded edge keeps the coating attached.
Burr, edge break and radius: three different things
Many drawings mix these up. Use the words carefully:
- Deburr: remove the burr. The edge may still be sharp.
- Break edge: remove the burr and add a small chamfer or radius. The size is specified.
- Radius or chamfer: a designed feature with a dimension and a tolerance, not a finishing note.
A drawing that says “deburr all edges” invites different results from different operators. A drawing that says “break all sharp edges 0.2 to 0.5 mm” gives the same result from every operator.
The note that works
A good general note has a size, a scope and an exception. Examples:
- “Break all external edges 0.2 to 0.5 mm. Remove all burrs.”
- “Deburr all holes and cross holes. No burr above 0.05 mm.”
- “Edges on sealing surface A: sharp, burr free. Do not break.”
The third example matters. Some edges must stay sharp, for instance where an O-ring seals against a corner or where a part must locate against a precise edge. An edge break of 0.3 mm on such an edge can ruin the function. Mark those edges explicitly and state that the general note does not apply.
The standards behind the numbers
ISO 2768-1 gives general tolerances for broken edges, meaning external radii and chamfer heights. For a nominal edge size of 0.5 to 3 mm the allowed variation is plus or minus 0.2 mm, above 3 up to 6 mm it is plus or minus 0.5 mm, and above 6 mm plus or minus 1 mm. The standard gives tolerances, not nominal sizes, so it does not tell the shop how big to make the break. You still need to state the size.
ISO 13715 covers edge notation on drawings and defines a symbol that states a maximum burr, an undercut or a passing size on an external or internal edge. Many shops understand it and many do not, so pair the symbol with a plain-text note.
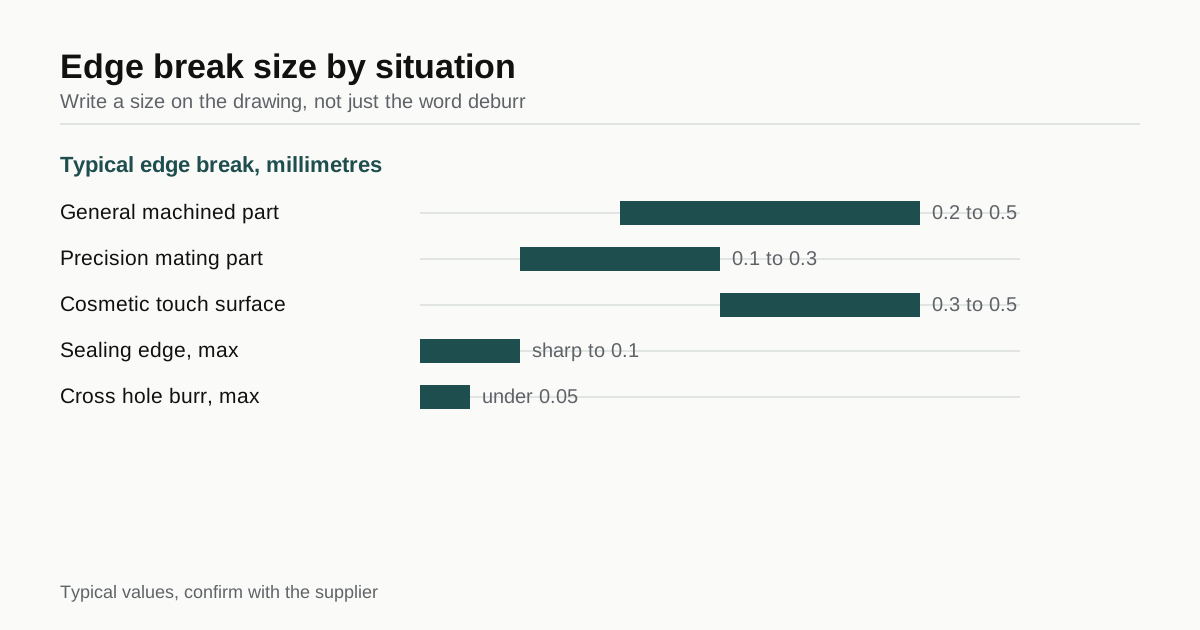
Typical edge break values
| Situation | Typical edge break | Notes |
|---|---|---|
| General machined part | 0.2 to 0.5 mm | Safe for handling, good for coatings |
| Precision mating part | 0.1 to 0.3 mm | Small break keeps location edges accurate |
| Sealing edge or O-ring groove | Sharp or 0.1 mm max | State burr limit, no manual filing |
| Thread entry | Chamfer to thread major diameter | Helps starting the screw |
| Cross hole intersection | Burr under 0.05 mm | Often needs a special method |
| Cosmetic or touch surface | 0.3 to 0.5 mm radius | Pleasant feel, hides small marks |
These values are typical and each design needs its own judgement. A part that must assemble into a tight bore needs a different edge from a part that is handled by customers.
How shops remove burrs
The method decides both cost and result. Common methods include:
- Manual deburring with files, scrapers and deburring knives. Flexible, slow and operator dependent. Good for small batches and accessible edges.
- Brushing with nylon or abrasive brushes, by hand or machine. Fast for outside edges and good for light burrs.
- Vibratory or tumble finishing. Parts rotate in media. Good for batches of small parts. It rounds edges everywhere, so it is not suitable for sharp edges that must stay sharp.
- Abrasive flow machining. A putty-like abrasive is pushed through passages. Used for internal channels.
- Thermal energy deburring. A gas explosion burns off burrs in a chamber. Reaches inside cross holes and complex blocks, and is common in hydraulic manifolds.
- Electrochemical deburring. Dissolves burrs at the spot with precise control.
- Tool path edge breaking. The machine itself runs a chamfer tool around each edge. Consistent and the most efficient method on a milled part when programmed from the start.
On a machined part the cheapest edge break is often the one the CNC program makes. A chamfer pass takes seconds and gives the same result on every part. Manual work adds minutes per part and varies. If your drawing specifies an edge break and the shop’s CAM includes it, the cost is small. The design changes guide lists other drawing choices that follow the same logic.
Cross holes, internal features and blind areas
The edges that cause trouble are the ones nobody can see. Where one drilled hole meets another, a burr stands inside the bore and a hand tool may not reach it. If the part carries fluid, that burr can break off in service.
For such parts, tell the shop which holes are critical. Say which intersections must be burr free, and how they are checked, for example with a borescope. Without that detail the shop assumes a visual check from the outside, and the burr stays. Thermal or electrochemical deburring is often the right answer on manifolds, and it adds cost that belongs in the quote from the start.
How burr is checked
A requirement that cannot be checked is not a requirement. Ways to inspect include:
- A fingernail test or cotton swab across the edge, as a simple screen
- Visual inspection under 10 times magnification
- A borescope for internal holes
- A profile projector or microscope with a measuring scale for burr height
- A go and no-go gauge for a chamfer size
State the method on the drawing or in the order. For a first order, ask for photographs of critical edges with the shipment. The first article inspection guide explains how to add such checks without a long report.
What deburring costs
Deburring is a labour item in many quotes, and it varies widely. A simple part with a handful of edges may need 30 seconds of manual work, and the cost is a small fraction of the part price. A manifold block with 40 cross holes may need minutes of work per part or a thermal deburring run at a separate cost. Tool path edge breaking costs the least per part and needs the right drawing note from the start.
If a quote seems high, ask the shop how many minutes it allows for deburring per part, and which method it assumes. If a quote seems suspiciously low for a part with internal channels, ask how the cross holes will be cleaned. Asking both questions takes one email and often reveals whether the shop has priced the real part.
Materials that burr more
Materials that burr more
Soft and ductile materials form bigger burrs. Copper, brass in some grades, annealed stainless steel, nylon and PEEK behave this way. Hard materials form smaller but sharper edges. For plastics, burrs are stringy and can stay attached. If your part uses such a material, tell the shop what finish you expect, because the removal method may need to change. The materials guide lists common choices.
Summary checklist
- Write a size, not just the word deburr
- Mark edges that must stay sharp and say the general note does not apply
- Give a maximum burr height for critical edges
- Name cross holes and internal intersections that must be clean
- State how the shop should check, and what evidence to send
- Allow time and cost for special methods on manifolds and internal features
When the drawing carries those lines, send it through the RFQ form. Up to three shops in Vietnam will quote deburring as part of the price, and we reply within 24 business hours.
Frequently asked questions
What is the difference between deburring and breaking an edge?
Deburring removes the thin raised metal left by cutting. Breaking an edge goes a step further and gives the corner a small controlled chamfer or radius. A note that says only deburr leaves the edge sharp. A note with a size, such as break edges 0.2 to 0.5 mm, gives a defined result.
What edge break should I ask for if I have no special requirement?
Most functional parts accept an edge break of 0.2 to 0.5 mm. If your drawing has no note, ISO 2768 gives a general tolerance for broken edges, but it does not state a nominal size, so state the one you want.
Can I write that a part must be completely burr free?
You can, but burr free is not measurable. Write a maximum burr height or an edge condition with a size, and state how it is checked, for example under 10 times magnification.
Need a quote for a part like this?
Send the drawing. We shortlist up to 3 machine shops in Vietnam, manage the order if you want us to and reply within 24 business hours.
Send my RFQ